Showing posts with label crafting. Show all posts
Showing posts with label crafting. Show all posts
Friday, December 09, 2016
All our gingerbread #family #gingerbreaddrama #justbecause
My daughter put together a gingerbread train, but the engine kept falling apart. So she ate it. So we'll just pretend that the cars are in the siding and the engine pulling elsewhere.
Wednesday, December 07, 2016
A Tinkerbell and her gingerbread house #KNK #Keunekeun
It's not easy to draw with edible pens on gingerbread. Especially if the tip isn't as narrow as I'd like. So the logo didn't come out as well as I'd like, but KNK fans will get it.

Monday, December 05, 2016
A Monbebe safari on gingerbread #MonstaX #KPop #Making
My sculpting skills need a lot of work, but I think it's cute. The gingerbread house wasn't as big as I thought, so it took two houses to get all of the members.


Of course, this is the inspiration behind the project..
Of course, this is the inspiration behind the project..
Monday, October 03, 2016
Maker Monday stamping and engraving #maker #crafting
My stamping

And engraving skills are improving.

The names are KPop groups and the engraving are the names in Korean. A couple have little gems on them where the "o" would be. My daughter says I need to find a different topic to stamp on these, so I guess I'll have to be more creative.
Wednesday, September 28, 2016
Maker Monday on Wednesday stamping metal and making necklaces #maker #jewelry #kpop
I needed new projects to work on, but haven't had any inspiration to go with. I finally went with the current thing in the house (kpop) and ways to support the groups. The first photo is both the good and the bad. I stamped group names on the front and engraved the Korean names on the back (or tried). I got better as I went.


Selfie with daughter as I was trying to take my finished photo above. If you look close enough, you'll see her over my shoulder above.

I did a necklace for my daughter and one for me. This is my current finished product. Not totally happy with it, so it'll likely change as I figure out how I want to fix it.
Selfie with daughter as I was trying to take my finished photo above. If you look close enough, you'll see her over my shoulder above.
Monday, July 11, 2016
Making butterflies for the garden #maker #pinterest
I saw this one come across my pinterest feed some time ago. As a result, I made it one of those things that when I had the time, I'd see if I could do it. I didn't reload their directions, I just improvised as I went. The fan blades came from my local ReStore. The big block of wood was something leftover from a different project. I started by painting everything. Two blades pink, two blades blue, and the post purple. A single screw for each pair of blades holds them onto the post.
I then painted what design suited my fancy onto the blades.

This is the finished product hanging in the garden. I used a zip tie through the top two holes of the top two blades to be the hanger. I also added two screws to the top as antennae on a whim.


I then painted what design suited my fancy onto the blades.
This is the finished product hanging in the garden. I used a zip tie through the top two holes of the top two blades to be the hanger. I also added two screws to the top as antennae on a whim.
Monday, June 27, 2016
Maker Monday coming from the Shire #Tolkien #Hobbit #Maker #display
I purchased a replica of Sting at the Renaissance Festival this past May. Since then, it's been sitting in a box waiting to be put on display with the rest of our swords/daggers. I wanted to do something different with it, but nothing necessarily extravagant. So, I went to Home Depot to check out their wood possibilities and came back with this round laminated pine. I painted it green to start.

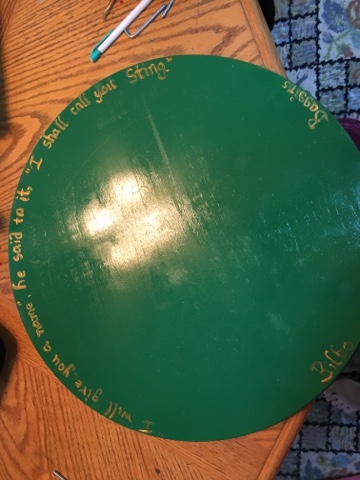
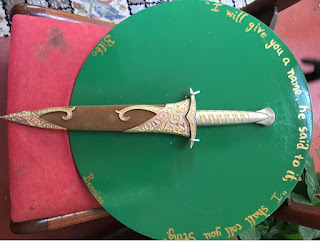
Then came the "dressing" for the display. I decided to use the quote from Bilbo in the Hobbit right after he gets the knife.
This is the finished product. It's not hanging yet. I'm half afraid to put it up in the playroom while I have kittens who are learning to climb in there. So, for now it'll wait a couple more weeks before it gets hung.

Monday, June 06, 2016
Creating a special ceiling light for Maker Monday #maker #craft #diy
We gave my daughter a loft bed to give her more space in her bedroom. As a result, the ceiling fan that had been in her room had to go. That left us with needing some sort of room light. We decided that most of the ones we liked were too expensive, so she created her own. We started with a basic LED ceiling light.

She then took acrylic paint to it and created a random block paint pattern.


She then took acrylic paint to it and created a random block paint pattern.
The nice side effect of this was that it took a VERY bright LED light and diffused it enough to make it a nice bedroom ceiling light. It's brighter than it looks in the picture, more of a soft white light.
Wednesday, May 11, 2016
Updates from the garden - Doors are appearing #fairydoors #gardening #ladybugs
Recent developments from my garden include doors! Seems I have new residents that are moving in.


I spent part of my mother's day working to make the garden more attractive to my new residents. I put down mulch and added a hanging plant. I had previously painted a pot with ladybugs and finally got around to filling it with ladybug friendly plants. Now I just need the ladybugs.
Monday, April 25, 2016
Maker Monday -so this happened #ladybug #golfball
With all the painting I was doing for my daughter's prop, this got done too. Spare golf balls found around the house.


Monday, February 08, 2016
Maker Monday creating a glowing wand
My simple list of tools. I found the mini party lights at a retailer online. The dowel I found at Wal-Mart. It's the same width as the lights. I used my dremel tool and my hot glue gun. From there, it's how you want to decorate the wand. Whether that's paint or other materials is up to you.

I first used the dremel with a sanding/filing bit to open up a hole just wide enough and deep enough for the loop part of the light. (Trial and error to get the right depth.)

Once it's big enough, I used hot glue to seat the light into the end of the dowel.

I checked to make sure it would light properly.

I used some scrap material to give it texture which I painted black. I then got "fancy" and used some scrap leather to wrap the handle section.

Ta Da! A light up wand. Took me about 2 hours total to do.

Monday, February 01, 2016
Wand Making with paper and paint #maker #crafting #HarryPotterinspired
My daughter and I tried this craft at Conjuration Con last year. It was so simple I wanted to share it. I didn't find a video of it and I really don't like my voice recording, so a series of photos is hopefully enough. Basic supplies are paper (I used printer paper), paint, glue gun, regular glue and sand. You can do it without the sand, but I think it adds a nice weight to the finished product.


Close the larger end with hot glue as well. You can either snip off extra paper or fold the extra to help close the end.


Paint. Colors and designs are up to you and your creativity. The green on the one wand is all hot glue. The bronze on the other is all hot glue.

Finished products. I put the two wands we made at Conjuration beside the two new ones. The paint wasn't quite dry when we left the con that day, so there are flaws in the ones on the left. Personally, I don't want my wand to be perfect, just fun. I have an idea that I want to try when I get the chance. When I do, I'll show you how it came out and what to do if you want to copy it.

Start by rolling your piece of paper. I like fairly narrow wands, so I tend to roll it tightly. If you want something fatter, that's up to you. Once you get to the end of the rolling, put elmer's glue to hold the roll together.
Close the narrow end with hot glue. Fill with sand through the wider end. I used floral sand. You can use play sand or even clean kitty litter if you'd prefer.
From there you get crafty with the hot glue. They created vines and such at Conjuration. I created neat ends on my sample wand. Then just wide enough for my hand to fit, I made a second band. I did a wrap up one wand and a sample vine on the other. You can't see the details as clearly here.
Paint. Colors and designs are up to you and your creativity. The green on the one wand is all hot glue. The bronze on the other is all hot glue.
Finished products. I put the two wands we made at Conjuration beside the two new ones. The paint wasn't quite dry when we left the con that day, so there are flaws in the ones on the left. Personally, I don't want my wand to be perfect, just fun. I have an idea that I want to try when I get the chance. When I do, I'll show you how it came out and what to do if you want to copy it.
Friday, October 23, 2015
There's a witch sleeping in my ivy #Halloween #crafting #maker
I regularly get crafting ideas across my feed on facebook and sometimes from pinterest. This year, I decided to take some old pool noodles and turn them into witch legs. The noodles have been in my garage for ages and I've had no real idea what to do with them, so this worked. I will say that instead of socks that most people recommended, I tried painting the noodles. The spray paint I used was fine until I had to use painter's tape to mark off the lines. The painter's tape peeled bits of the paint back off. If I do it again, I may just use the base color of the noodle and something like duck tape for the stripes. The hat is a cheap one from Dollar Tree. I had made one, but I decided I didn't like the way it came out. The "shoes" came from Dollar Tree as well. I didn't feel like sacrificing some of my own for the yard decor.

Wednesday, October 21, 2015
Spiders in the garden #crafting #Halloween #maker
Not as pretty of a spider. He's 2 garbage bags. I found the bottom half of a tv tray's stand and covered it with a garbage bag. I sliced it and inserted sticks for legs. The body & head are one bag that I zip tied to make separate. The eyes and fangs are made the same way as the other spider, coke bottle tops and plastic bottle holders. He'll look better at night when I put a small light on him from below.

Monday, October 19, 2015
Halloween crafting #spider #maker #crafts
When making stuff for Halloween, I prefer to reuse parts I already have on hand. In this case, a large pot and some tubing I'd gotten for a different project. I also used a black garbage bag for the head and attached the tubes/legs to the bag as well. That way, when the holiday is over, I have less to clean up. The eyes are coke bottle caps, the fangs are pieces of plastic that hold multiple bottles together (ie ketchup bought in bulk from Sam's). He's "hiding" under my rose bush to cover flaws in design and implementation.

Monday, September 28, 2015
Crafting with leather #maker #cosplay #craft
When cleaning out the attic, I came across a bag of scrap leather. I'd purchased it a long time ago and never started any of the intended projects. I finally decided to play with it this past week. I came up with a more "medieval" waist pouch, just big enough for wallet and phone. Fortunately, my primitive stitching isn't too obvious. It'll take a good bit more practice with leather before I'd call myself "ok". The shape of the flap is simply the way the scrap was cut. I didn't do any further trimming to the leather. Just folded and stitched (while using a hammer & nail to punch holes so that I could actually get the needle through).


Thursday, October 16, 2014
I've achieved wings! #diy #maker #Halloween #craft

The material covering the frame is from Hobby Lobby's scrap material area. It has cool spider webs on it for the Halloween theme and only cost about $2 total. I tried to get a shot of the material up in front of the window, but my camera wasn't sure where it was focusing and tried to get the trees through the wing. The material covers both sides and is hot glued on. I used ribbon around the edge to clean up the edges.
The strings to hold it together to the body are extra shoe laces. I took an extra bit of coat hanger to the middle of each to give it support/structure, then glued them on. I'll go back at some point and may use thread to reinforce it.
VOILA! Black spider webbed wings. Not sure what I'm going to use them for, but they look cool to me.
Monday, September 15, 2014
Hylian Shield #DIY #cosplay #Zelda #TwilightPrincess
When it came to being able to cosplay Link, my son only actually asked me to make the shield. I did the sword first, then the shield. I remembered to take more pictures this time as well. Supplies needed were foam board (2 pcs from Hobby Lobby for $5), paint (already had), xacto knife (already had), pattern (from youtube), and patience. It took me about 4-5 hours to do all together.
I started first with cutting out the base of the shield from one piece of foam board. It took up most of the sheet (20"x25").

The smaller pieces I got out of the bits left over from the initial cut. The bird will be a stencil that I'll use to paint onto the shield, instead of using extra foam board.

I got one side of the foam board wet (damp cloth) and then put it up so that weights would force the foam board to warp like I wanted it.

While the base dried to it's new shape, I painted all the smaller pieces. Most were silver, the triforce is gold.

Everything pre-painted, but not assembled.

Start of the assembly process. I didn't like the edges on most of it, so I used silver duck tape to trim the edges out. It didn't work as well as I'd hoped, but well enough for now. This is most of the smaller pieces glued to the shield.

After using my bird stencil, I had this on the shield. I went back a second time without the stencil to clean it up.

The back was spray painted black. The straps are black duck tape. (Duck tape fixes everything.)

The front with all the details. The rivets are buttons covered in duck tape, trimmed, glued. The curls are grey marker that I free drew on.

Sword and shield together. For a first time for both, I'm rather happy with the results. I think I'll try other methods of cutting or different foam board next time for the shield.

I started first with cutting out the base of the shield from one piece of foam board. It took up most of the sheet (20"x25").
The smaller pieces I got out of the bits left over from the initial cut. The bird will be a stencil that I'll use to paint onto the shield, instead of using extra foam board.
I got one side of the foam board wet (damp cloth) and then put it up so that weights would force the foam board to warp like I wanted it.
While the base dried to it's new shape, I painted all the smaller pieces. Most were silver, the triforce is gold.
Everything pre-painted, but not assembled.
Start of the assembly process. I didn't like the edges on most of it, so I used silver duck tape to trim the edges out. It didn't work as well as I'd hoped, but well enough for now. This is most of the smaller pieces glued to the shield.
After using my bird stencil, I had this on the shield. I went back a second time without the stencil to clean it up.
The back was spray painted black. The straps are black duck tape. (Duck tape fixes everything.)
The front with all the details. The rivets are buttons covered in duck tape, trimmed, glued. The curls are grey marker that I free drew on.
Sword and shield together. For a first time for both, I'm rather happy with the results. I think I'll try other methods of cutting or different foam board next time for the shield.
Subscribe to:
Posts (Atom)