Showing posts with label maker. Show all posts

Monday, October 03, 2016

Maker Monday stamping and engraving #maker #crafting

My stamping

And engraving skills are improving.

The names are KPop groups and the engraving are the names in Korean.  A couple have little gems on them where the "o" would be.  My daughter says I need to find a different topic to stamp on these, so I guess I'll have to be more creative.

Wednesday, September 28, 2016

Maker Monday on Wednesday stamping metal and making necklaces #maker #jewelry #kpop

I needed new projects to work on, but haven't had any inspiration to go with.  I finally went with the current thing in the house (kpop) and ways to support the groups.  The first photo is both the good and the bad.  I stamped group names on the front and engraved the Korean names on the back (or tried).  I got better as I went.


I did a necklace for my daughter and one for me.  This is my current finished product.  Not totally happy with it, so it'll likely change as I figure out how I want to fix it.


Selfie with daughter as I was trying to take my finished photo above.  If you look close enough, you'll see her over my shoulder above.

Monday, July 11, 2016

Making butterflies for the garden #maker #pinterest

I saw this one come across my pinterest feed some time ago.  As a result, I made it one of those things that when I had the time, I'd see if I could do it.  I didn't reload their directions, I just improvised as I went.  The fan blades came from my local ReStore.  The big block of wood was something leftover from a different project.  I started by painting everything.  Two blades pink, two blades blue, and the post purple.  A single screw for each pair of blades holds them onto the post.

I then painted what design suited my fancy onto the blades.

This is the finished product hanging in the garden.  I used a zip tie through the top two holes of the top two blades to be the hanger.  I also added two screws to the top as antennae on a whim.


Monday, June 27, 2016

Maker Monday coming from the Shire #Tolkien #Hobbit #Maker #display

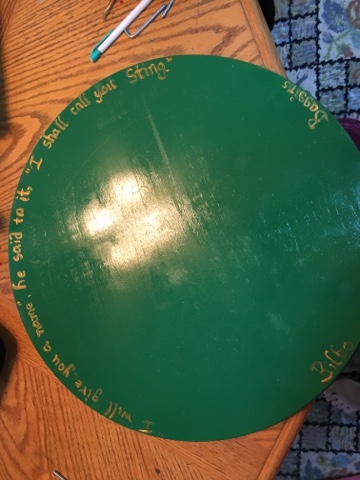
I purchased a replica of Sting at the Renaissance Festival this past May.  Since then, it's been sitting in a box waiting to be put on display with the rest of our swords/daggers.  I wanted to do something different with it, but nothing necessarily extravagant.  So, I went to Home Depot to check out their wood possibilities and came back with this round laminated pine.  I painted it green to start.


Then came the "dressing" for the display.  I decided to use the quote from Bilbo in the Hobbit right after he gets the knife.


This is the finished product.  It's not hanging yet. I'm half afraid to put it up in the playroom while I have kittens who are learning to climb in there.  So, for now it'll wait a couple more weeks before it gets hung.

Monday, June 20, 2016

Learning to use a sewing machine on Maker Monday #diy #maker #sewing @TheSewingStudioInc

I took my daughter to the Sewing Studio.  While there, we learned to PROPERLY use my sewing machine and she put together two drawstring laundry bags.  I think we have a bit more learning to do, but some of it makes more sense now.

Monday, June 06, 2016

Creating a special ceiling light for Maker Monday #maker #craft #diy

We gave my daughter a loft bed to give her more space in her bedroom.  As a result, the ceiling fan that had been in her room had to go.  That left us with needing some sort of room light.  We decided that most of the ones we liked were too expensive, so she created her own.  We started with a basic LED ceiling light.


She then took acrylic paint to it and created a random block paint pattern.

The nice side effect of this was that it took a VERY bright LED light and diffused it enough to make it a nice bedroom ceiling light.  It's brighter than it looks in the picture, more of a soft white light.

Wednesday, May 11, 2016

Updates from the garden - Doors are appearing #fairydoors #gardening #ladybugs

Recent developments from my garden include doors!  Seems I have new residents that are moving in.


I spent part of my mother's day working to make the garden more attractive to my new residents. I put down mulch and added a hanging plant.  I had previously painted a pot with ladybugs and finally got around to filling it with ladybug friendly plants.  Now I just need the ladybugs.

Monday, May 02, 2016

Maker Monday - more from the growing Fairy garden #maker #garden #fairy


The water wheel turns due to the solar pump.  The frog is holding the solar panel that provides the power.  The plants are slowly spreading, so the bare spots shouldn't be bare for too long.


Monday, April 25, 2016

Maker Monday -so this happened #ladybug #golfball

With all the painting I was doing for my daughter's prop, this got done too.  Spare golf balls found around the house.


Monday, April 18, 2016

Maker Monday - cosplay props #spear #worbla

Not the best work ever, but not bad either.  The spear head is a foam core with worbla over it.  It didn't bond to the foam like I'd expected, so it's not as good a shape as I'd hoped for.  The black/gold portion is foam board (like you'd use for projects) with worbla on top. That came out better.


The circle portion is styrofoam from Michael's/Hobby Lobby that I cored and shaped.  The stripes are string.  The triangle on top is foam board with duck tape.


It's big.  It will be interesting getting it into the car for Momocon and may even have to ride on top.  But, daughter is happy she now has the spear to go with her character.  (Don't ask me who it is, I have no idea.)

Monday, April 11, 2016

Maker Monday - Face casting with @The-Engineer-Guy #Geekspace #TheEngineerGuy

So getting my daughter's prop ready is taking longer than expected.  However, she took a cool class this past weekend thanks to The Engineer Guy.  I thought I'd share what she MADE on my maker Monday.

We were lucky enough to find someone her age willing and interested in taking the class.  My daughter cast the other girl's face first.  I don't know what all was used. While they were classing, I was shopping the store.  I came in during this part and took pictures.


This was my daughter after she'd had her face cast and with the cast still drying ON her face.


The finished face casting.  The ridge at the top was the shower cap that covered the hair.  The rest is blemishes in the casting.  Not bad, though, for first timers.

Monday, April 04, 2016

Maker Monday My daughter's fairy garden #gardening #maker

This is the garden my daughter has put together.  It's center is a small dragon guarding his treasure.


Monday, March 28, 2016

Maker Monday Updating Fairy Gardens #gardening #maker #gnome

This one is a small garden I put together out of an old bird bath when my parents moved.  I change it around every so often depending on how the plants are doing.


My daughter is putting her own garden together, I'll show it off next week.  Together she and I are doing one big one.  It's still very much under construction, so it'll have to wait a while longer.

Monday, March 21, 2016

Making a paint tank #Splatoon #cosplay #maker


The tank portion is fairly straight forward.  I took 4 2-liter bottles, cut the bottoms off of two, inserted one into each of the cut off bottles and then taped them together.  I zip tied the 4 bottles together and then painted.


This is the base of the backpack to hold the tanks.  I bought a kids backpack from Goodwill and sliced the back off of it.  I also bought a basket just for the frame and sliced the basket the basket of of it.  I duct taped the parts together.  The duct tape will be hidden by the tanks themselves.


Here's the finished product (not attached to the paint roller yet).


I'm not really satisfied with how it came out. I'm probably going to scrap it and start over with a different design. In the meantime, I'm going to start working on a prop for my daughter for Momocon.

Friday, March 18, 2016

Prop making for cosplay #Splatoon #paintroller #maker


I plan to cosplay an inkling (from Splatoon) at MomoCon.  As such, I need my equipment to go with the costume.  I don't give measurements as it depends on whom you're putting this together for.  I built it to size for me.

Parts required:
3" PVC
3/4" PVC
1/2" PVC
4 1/2" right angle PVC connectors
1 3/4" PVC T-connector
2 3/4"->1/2" connectors
1 Pool Noodle
1 metal rod/rebar
1 roll polyfill

The tubing in the picture actually goes to part two of the project.

The metal bar goes through the t-connector for added support.  The top is simple.  Connect two pieces of the 1/2 to the t-connector after putting the rebar in first. Connect angles to make a rectangle just wide enough for your 3" PVC to be able to hang.  The pool noodle goes inside the 3" pvc to give it something to "roll over".  The 1/2" pvc should fit into the pool noodle nice and tight.

First coat paint and after the poly fill has been hot glued onto the 3" PVC.

Finished project.  An oversized paint roller.

I'll admit that my paint job isn't accurate to the game, but I had fun painting it any way.  Most of my costume won't be "accurate", but I'm just playing so I'm ok with that.  We'll have to see what the cosplayers at MomoCon think about it when I get there.


Monday, March 07, 2016

I re-purposed a fish tank into a Fairy garden #pretty #garden #miniplants #maker

When we visited the Monastery a while back, I shopped the garden area.  I brought home the house, sign and 3 small plants (front left, potted by house, rear right).  The rest of the plants are babies from some of the plants I already had.  The crystals are some we found when we went gem mining in Dahlonega last year.  I put it all in a small fish tank that had been sitting and gathering dust at the house.  There is a lid on the tank as the cats would otherwise play in the dirt too.

Monday, February 15, 2016

Maker Monday and creating blessings bags to give to those in need

To follow on my rant with doing what you can, while this isn't necessarily for the kids at school (though it could easily be given to a child/adult at school).  I have two of these in my car ready to go at any given time.  They're called "Blessings bags" and they give some temporary comfort to someone in need.  

They're not hard to create and you can fill them with what you think is appropriate.  I take my time and spread the cost out so that I'm not feeling pinched in the wallet.  Most of it comes from the Dollar Tree stores, though sometimes I find a real good deal elsewhere.  The bags are those I get from festivals or events (there's almost ALWAYS someone giving those away as a promotion).  Some of it, like the hand towels, I'll find in bulk and divide up.

This bag is my "female" bag.  I keep meaning to add feminine hygiene to it, but it's otherwise ready to go.  It's only "Female" right now as the gloves are pink and the socks are sized for women.  Otherwise, it could be for either.


This one is my "male" bag.  I found the gloves/cap on sale at Dollar General.  The blankets are on sale at Wal-Mart.  The rest I bought in bulk at some point and am still dividing up.


They ride in my car 24x7 generally. The only thing I have to watch as to make sure the food doesn't expire.  I rarely have the bags in my car long enough for that to happen.  If it comes down to it, though, they make great emergency kits to keep in the car as a "just in case".

Monday, February 08, 2016

Maker Monday creating a glowing wand


My simple list of tools.  I found the mini party lights at a retailer online.  The dowel I found at Wal-Mart.  It's the same width as the lights.  I used my dremel tool and my hot glue gun.  From there, it's how you want to decorate the wand.  Whether that's paint or other materials is up to you.


I first used the dremel with a sanding/filing bit to open up a hole just wide enough and deep enough for the loop part of the light.  (Trial and error to get the right depth.)


Once it's big enough, I used hot glue to seat the light into the end of the dowel.


I checked to make sure it would light properly.


I used some scrap material to give it texture which I painted black.  I then got "fancy" and used some scrap leather to wrap the handle section.


Ta Da!  A light up wand.  Took me about 2 hours total to do.